Category: Uncategorized
Tips for a Successful Yard Sale
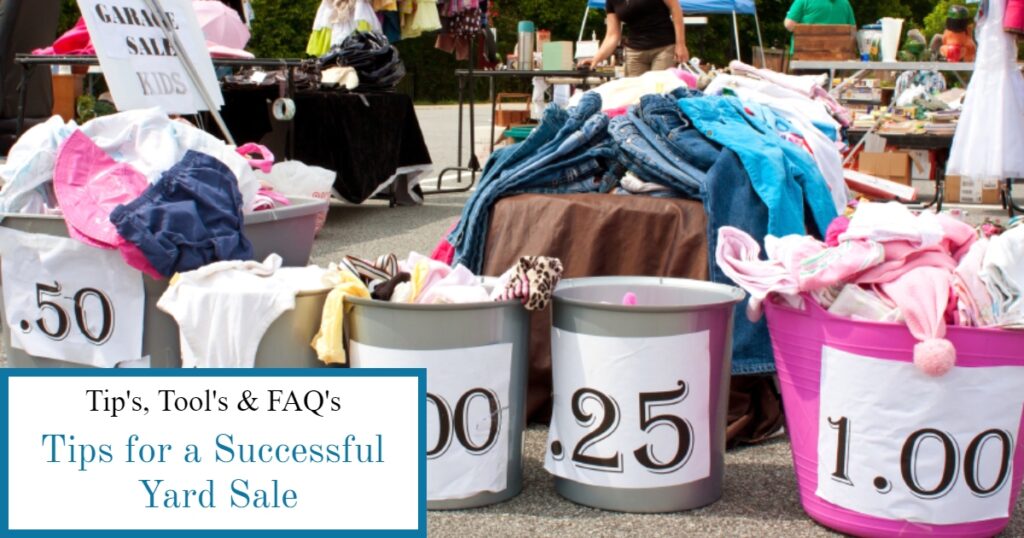
The official start of Spring is in March but in Maine Spring begins for most with the first yard sale. Yard sales are a favorite hobby of the avid bargain hunter. Hosting a successful yard sale is a lucrative event. Successful yard sales take planning and organization, so having a clear plan of action can greatly reduce the stress and extra work associated with a yard sale. There is a huge difference between a well planned yard sale and one thrown together at the last minute. It’s evident the second you walk into the yard. Rows of neatly laid out items, clearly marked with prices as opposed to piles of things heaped on the lawn with no tags. It’s definitely worth the time and effort to plan and organize your sale. Most people will walk away from the heaps of items piled on the lawn. Tips for planning a successful yard sale are below.
If this is your first time hosting a yard sale take a little time and think about the yard sales you have been to. Were the items displayed in a pleasing manner, how were things tagged, what did the signage look like. These clues can help you plan your yard sale with a few extra tips listed below.
Planning Tip:
Plan far in advance. Choose a date and stick to it. Decide if it’s going to be a one day deal or a two day event, typically 2 day events are more successful. This will help you break down the list of things that need to be done in a timeline. The timeline will help you keep on track and make sure you aren’t rushing at the last minute to complete tasks that could have been done weeks or months ago for a smoother sale. This is what a typical timeline could look like.
January/February: Declutter the house and sort sale items, donation items into bins. Throw out the other things that no longer have a use. Arrange to donate the items sorted to appropriate organizations.
March: Clean, wash and repair all the items for the yard sale. Organize them into boxes or totes to keep them organized. Price the items that need to be priced. PRO TIP: Sort into categories to make set up at your sale easier. Label the totes with the category. The Dollar Store is a great place to find inexpensive price tags or masking tape and permanent markers for pricing your yard sale goodies!
April: Research expensive items or old items for their current value. You wouldn’t want to put Aunt Betty’s 1890 painting she had hanging in her living room for $5.00 to find out it’s worth $5000.00 to a collector. Those items will require a different kind of sale to gain the best value from them. PRO TIP: Pricing can be tricky too high and no one will be interested so remember yard sales are for bargain hunters and price accordingly. It is best to keep sentimental value out of the equation when deciding on a price. For new or larger items like furniture, the best rule is 25 to 30% of the original value. For example, you purchased a table for 100.00 ten years ago and it’s still in great shape, at your yard sale the price tag should be 25 to 30 dollars and be prepared to haggle.
May: Make signs that are easy to read. Plan out your advertising. Keep it simple to gain the biggest return on your sale. Plan how your yard sale will be laid out, keeping in mind the successful yard sales you have been to before. Gather the items you need for the day of the sale: tables, chairs, cash box, cooler with lunch etc. Have an exit plan for the yard sale: a bag full for 1.00 so you have less to take down or nothing special because you plan on having another yard sale in the next weeks or months. Know ahead of time what you want so you can plan accordingly. PRO TIP: Keep your signs simple and easy to read, choose fluorescent colors to catch the eye. Keep the sign to three lines: YARD SALE, Date & Time, Location remember people will be in their cars driving by so the larger the letters the better. Also choose a stop sign or location where people will have to be going slow so they have time to read it all. If you need extra tables consider using boards and boxes to create tables. Plan on donating the left over items from your yard sale? Make arrangements now to drop off or arrange to have someone pick up your donations.
Week to several days before sale: set up tables and put up the signs in strategic locations to make people aware your sale is happening. PRO TIP: Plan the layout of your sale and have it on paper so when it’s time to set up you have a clear idea of where things will go.
2 days to the sale: start putting out things that can be protected from night time dew or rain. You can hide sealed totes under the tables making the day of the yard sale an easier set up. Have help moving big furniture pieces into place and cover them with plastic for protection. PRO TIP: This would be a great time to verify everything is clearly marked with a price. If you like to haggle you can make your yard sale a “name your price” sale but have in mind a fair price for someone who doesn’t want to haggle. Use the Dollar Store again for inexpensive plastic tablecloths or coverings.
1 day away: get balloons to add at the end of the driveway with your sign to catch people’s attention. Put out as much stuff as you feel will be protected from night time moisture to help you be more prepared for the day of the sale. Make sure you have change for sales and bags to help people take home their treasures. If you need to make signs for the fill a bag for the last hour of your sale have them ready. PRO TIP: Have help lined up to help you set up and take down the sale at the end. Set up your check out area in the shade or have a popup canopy for your protection from the sun.
Day of the sale: Make sure you have enough time before the sale starts to have everything set up. Have your cooler packed the night before with your water and lunch to save time. Place your attention-getting sale sign with the waving balloons early. Lock your house for your protection while the sale is going on. You wouldn’t want strangers wandering into your home while you were occupied with the sale. Another safety tip is to keep your coins for making change in a money box but the bills on your person. PRO TIP: Have someone lined up to come give you a quick break to use the restroom throughout the day.
This is a basic outline, it can be changed to suit your needs. Clearly planning helps keep your sale moving along and eliminating the last minute rush and stress. Ultimately the success of your yard sale rests a lot on the items you have available, the prices you have set and what your bargain hunter is looking for. Having a wide variety of items helps you appeal to a broader range of shoppers! Good Luck and Happy Yard Sale!
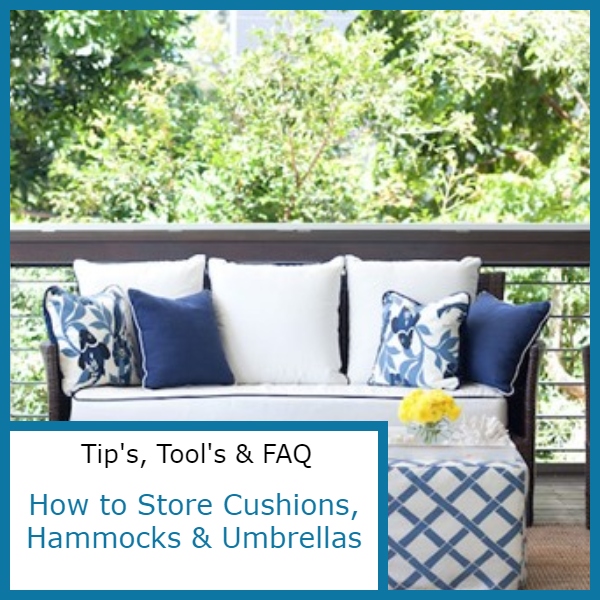
How Do You Clean and Store Patio Cushions, Hammocks and Umbrellas in Brewer, Maine?
Living in Brewer, Maine has its challenges especially when it comes to your outdoor living time. The season for patio and outdoor living in Brewer last about five months which means your patio furniture is stored appropriately seven months of the year. Ever take your patio furniture out of storage and find mold and mildew have taken up residence on your cushions, hammock or umbrella material? Preventing this phenomenon starts before putting your patio furniture in self storage. Simple cleaning tips for optimum self storage of your outdoor living investment can help prevent damage during it’s off season time.
Cushion Care:
No list of cleaning tips would be complete without discussing the cushions used to create your comfortable patio or deck space. Cushions are either removable or not. The removable cushion covers can often be washed in a washing machine with any laundry detergent. Cleaning your cushion covers by hand is the best way to give them a really deep cleaning. First remove the foam core, then remove any loose dirt by brushing the cover. Next soak the covers in a bucket of warm soapy water, then scrub with a soft bristled brush. Cleaning Tip: Scrub the inside of the cover as well, to remove stubborn or deep stains. Then rinse with clean water and allow to air dry thoroughly before reinserting the foam cores.
Non removable cushions are almost as easily cleaned. Sponge on the warm soapy water and rub to create a foamy coating on your cushions. Scrub any extra dirty spots with a soft bristled brush until the dirt is gone. Use a high pressure setting on your hose nozzle to rinse the foam and all soap residue from the cushions. Squeeze excess water from the cushions and allow them to thoroughly dry.
Cleaning tip: If your cushions already have some mold and mildew, mix a solution of 1 gallon of water, 1 cup of bleach and ¼ cup of mild detergent. Using a spray bottle, spray onto the affected area, allow to soak in for 15 minutes or so then use a soft bristled brush on the area until the mold and mildew are gone. A sponge or cloth will work equally as well to remove the mold or mildew stain. Storage tip: Place thoroughly dry cushions in plastic bags to protect them during storage. Garbage bags work great for storing cushions. Add a strong scented dryer sheet for fresh smelling cushions in the Spring plus mice dislike strong odors which will help protect your cushions from rodent damage while being stored. Keep your cushions off the floor especially if it’s a concrete floor. Moisture is the leading cause of damage to stored cushions.
Hammock Care:
Remove the hammock from its frame, lay on a tarp and sweep off any surface debris. Wet the entire hammock with a hose. Using a mixture of warm water and dish soap sponge clean all surfaces of the hammock. Rinse all soap from the hammock and dry thoroughly. Cleaning tip: If mold and mildew have stained your hammock material use full strength white vinegar and scrub the area using a hand brush, allow to sit for 10 minutes or so then rinse and allow to dry before storage. Once dry, fold and store in a contractors garbage bag or wrap in plastic to protect the hammock during storage. Storage tip: if your hammock frame is easily disassembled place it in the same bag. This will make finding all the pieces easy when you are ready to relax on your patio again next summer!
Umbrella Care:
The fabric of your umbrella is easily cleaned once you remove it from it’s frame and lay it out on a tarp to protect it from grass and dirt while cleaning it. Sweep the loose debris from the fabric, scrub any mold or mildew areas with a dry brush, then wet with a hose until all the fabric is wet. Mix a cleaning solution of 2 cups of warm water, 2 cups of white vinegar and a tablespoon of dish detergent (Dawn cuts grease). Scrub the umbrella fabric with a hand held brush and the cleaning solution until the entire umbrella is covered. Let the solution set for 10 minutes then rinse with a hose to remove all of the cleaning solution. Allow to air dry thoroughly.Cleaning tip: Treating the umbrella fabric for mold and mildew before storage will help protect it during the months stored. If after cleaning you see additional mold and mildew stains wet the fabric and scrub using a hard brush and full strength white vinegar, allow to sit for 10 minutes, rinse clean and allow to dry. Storage Tip: Place a clean and dry umbrella in a bag and tie to the cleaned umbrella frame.
Mold and Mildew Removal:
A generic mold and mildew cleaning solution that will work on most surfaces is a 50/50 mixture of water and white vinegar. Spray on the surface of your furniture, let it set 30 minutes before rinsing. Follow with a towel drying and then allow to thoroughly air dry. For extensive mold and mildew removal especially on fabrics like cushions, hammocks and umbrellas, dry brush the area to remove surface mold, rinse and allow to dry. Scrub using a hand brush and full strength white vinegar completely soak and scrub the affected area, let sit for 10 minutes then rinse off with clean water and let dry. Protecting your outdoor living and patio furniture from mold and mildew is important to prolonging the life of your investment.
Cleaning your furniture properly before putting it in self storage is the best way to protect it. An additional step would be to add strong scented dryer sheets in the bags to prevent rodent invasion. They dislike strong odors. Check with the storage facility to be sure they have pest control methods in place. With regular cleaning and proper storage you can enjoy your patio living space for years to come.
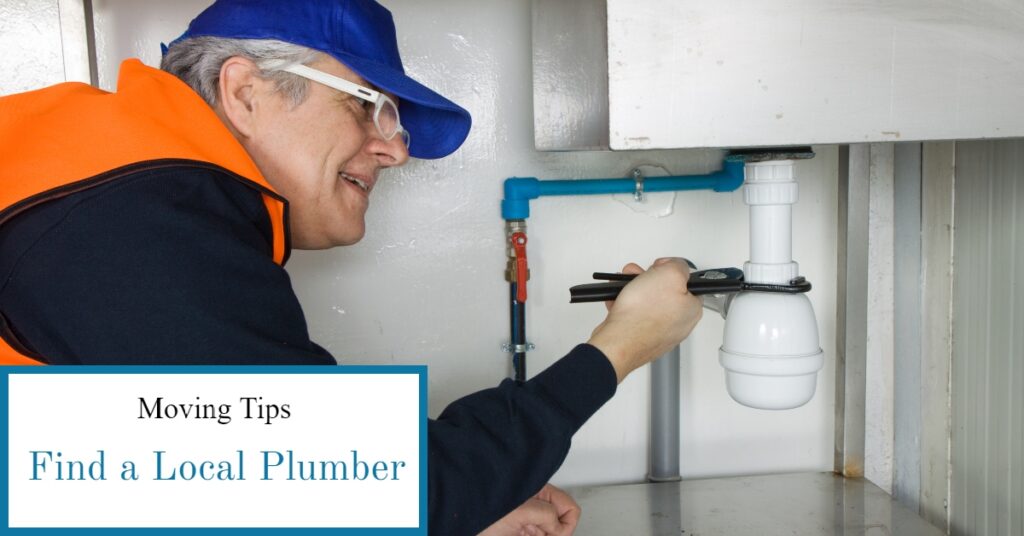
How to find a local plumber
Moving has many challenges including finding service people, especially a good local plumber, to help keep your new home in Brewer, Maine running smoothly. Finding a good local plumber before an emergency strikes can make the difference between minor damages or a total catastrophe. When finding a local plumber your first resource could be the previous home owner. If they had a local plumber you could ask who they used and how they felt about their service. But what if they didn’t have a plumber or didn’t like the plumber they had? Here are some important questions and considerations when searching for a good local plumber.
Referrals:
If you have family or friends who live close by, ask for a referral. Ask if the company or plumber provides emergency services, as we all know emergencies rarely happen during regular business hours. Still research the referral they may or may not be a fit for you. If you don’t have family or friends close by, use the Internet and search for “Local plumbers near me” read the reviews, both the positive and negative ones. Pay attention to how the owner or plumber responded to the negative reviews. Was the issue resolved, did the company respond compassionately or defensively. These would be a huge consideration when choosing a local plumber. Also use the Better Business Bureau, on the BBB website you can look up the rating for a company.
Communication:
Communication is one of the most important aspects of any business relationship. Your first contact with the local plumbing company or plumber will help you determine the likelihood of a good fit. The initial contact can be a huge clue as to the level of communication you can expect if you become a client. Where they courteous or curt, do you feel like all your questions were answered or not? These are some things to think about after your conversation.
Licensing and Certifications:
All states require some form of licensing or certification to become a plumber, be sure to ask for their license number and verify it. Your State’s government website has a “verify a license” tool, easily accessible via a web search for <Maine (or your state) plumbing license lookup>. The tool is easy to use and will verify the plumber’s license! Ask if all their employees have a license and if you can request a master plumber if you feel the job requires their expert knowledge. A master plumber has years of experience and even though their hourly rate is generally much higher than a journeyman’s rate they could save you time and money with their extra knowledge.
Insurance and Bonded Company:
You should ask about the type of insurances they hold. As a business they are required to carry some form of liability insurance to cover you if there is an issue. They should also carry Workers Comp Insurance to protect their workers from any injury they incur. If they don’t have workers comp insurance be aware that you will be held responsible for any and all injuries that happen while working on your house. The next type of insurance is bonding. Bonded means a bonding company has set aside a certain amount of money in the event a customer files a claim against the plumbing company. The state holds control of these funds not the plumbing company. You should check to verify they are actually bonded as well.
If you choose a company that isn’t bonded and insured and something happens while they are on your property you accept all the responsibility for any injury or damage. It’s not worth taking the risk for a cheaper rate. You could ultimately lose everything because you chose a company that was uninsured and not bonded.
Emergency or After Hours Service:
One very important consideration when choosing a local plumber is; Do they have an “on call” service? Do they provide assistance when an emergency arises at 2am on a Sunday morning? Most companies will only take on your emergency if you are already a customer. It is recommended that you schedule a routine service call to establish that relationship. Walk through your home, take note of any leaky faucets, low pressure in your shower head or sinks, drains that are not going down well, etc and call to set up an appointment. This will establish your relationship.
Rates:
Rate comparison may be the most confusing aspect of finding a local plumber. There are many variables to a rate. Some companies have a flat rate for a certain service and an hourly rate for others. It’s important to find out as much as you can about how they bill to avoid a shock after a service call. Ask the following questions:
- Do they bill for travel time?
- Do they have a minimum charge rate? IE will they bill you for an hour even if the tech is only there for 30 minutes
- How do they bill if it goes over the minimum time? Some bill by the 15 minute increments after the first hour and some in 30 minute increments.
- What is their rate for a master plumber, a journeyman, or an apprentice?
- What is the emergency rate? Most places have a different rate for emergencies
- Can I request a certain plumber? This is important if it’s not a single person business.
The average range for the hourly rate goes from $45/hour to $150/hour. The higher end of the rate scale is for the master plumber or the emergency rate. Remember the hourly rate is only part of the equation for your total bill, included will be travel time(if charged), materials, parts and supplies if used.
Finding a good local plumber can take a little time but when an emergency does happen you will be glad you made the effort and are already a customer. One call and your plumber is on the way hopefully before any real damage occurs. If the unthinkable does happen remember to use self storage while the damage is being repaired!
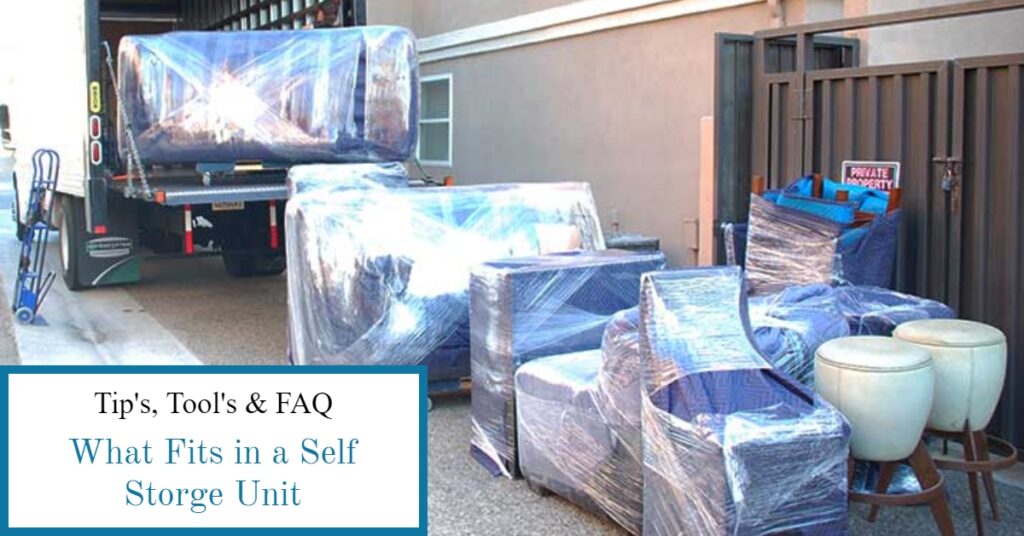
If you are like most of us square footage means nothing. Short of pulling out the tape measure and measuring out the area of a self storage unit in Bangor, Maine and visualizing if what you have will fit into that space. It’s hard to imagine. Then take into account the height of the self storage unit this will also influence what will fit. Choosing a self storage unit that is appropriate for your needs can be easy by using the size guide below and utilizing the knowledgeable staff in Bangor. Safety tip: boxes and totes should not be stacked higher than your shoulders. Lifting heavy items from over your head can lead to injury so use care when stacking your boxes and totes in self storage.
The self storage industry uses standard size guides to help determine what will fit into a designated size unit. Take into consideration if your items are larger or smaller than the standard size when making a decision on a unit. Between the size and height of a unit and the measurements of the items going into storage, you can see how tricky it can be to choose the right size for your needs. Self storage facilities have a simple size guide that can assist you in choosing the correct unit. This size guide will provide you with a general idea of what will fit in a self storage unit based on the size.
5×5 Size Guide:
A 5×5 self storage unit is like a small closet, great for storing a small dresser, a twin mattress and several small boxes. It is also perfect for seasonal decorations, clothing, sports equipment, lawn and garden tools or just a little extra storage space if you have a small apartment. Looking to store old files from your office? 40 standard file boxes will fit in this size unit.
5×10 Size Guide:
A 5×10 self storage unit is like a walk in closet. This size is great for a couch, chair, standard bureau and some small boxes. For an office looking for some off site storage 85 standard file boxes will fit.
10x10 Size Guide:
A 10×10 self storage unit is equivalent to an average bedroom. This size will hold the standard furnishings from a one bedroom apartment. For off site storage for standard file boxes it will hold about 170 standard sized boxes.
10×15 Size Guide:
A 10×15 self storage unit is equivalent to a large bedroom. This size will hold the furnishings from a 2 bedroom apartment or a small house. Offices needing off site storage will be able to store 290 standard sized file boxes. A two door small car can be stored in a 10×15 unit.
10×20 Size Guide
A 10×20 self storage unit is like a large one car garage. This size will hold furnishings from a 3 or 4 bedroom apartment or house. A car, truck or small tow-behind camper can be stored in a 10×20 unit.
10×30 Size Guide:
A 10×30 self storage unit has the capacity to hold a 5 to 7 bedroom house. This unit can easily hold a car or truck plus the furnishings from a small house. This size unit is great for a large tow-behind camper or a small RV. The size of the RV or camper is limited by the height of the door for access and the length of the vehicle.
If the simple guide above doesn’t clarify the size needed we have three resources available to assist in a decision on the appropriate size. The first is our Size Guide , the Space Estimator and our friendly, professional staff who are always ready to help you.
What if I choose the wrong size and realize it after I’ve rented the unit? If you find you need a larger space the facility manager will be able to easily assist you. What will fit in a self storage unit can vary depending on your packing and stacking skills. A nicely packed unit will hold more than one that is unorganized. Tip: consider using a moving company to move your items into storage, they pack and stack for a living!

How safe are self storage units in Ellsworth, ME? Security is an important consideration when choosing a self storage unit. There are many factors affecting how safe a self storage facility can be. Most important are the measures the facility has in place and the things you can do to help secure your property while in storage. Ask about the security measures in place before you decide!
What Security Measures Are Already in Place?
We utilize each of the following security measures at our facility but what if we aren’t near you? Check out the security protocol the self storage facility has in place, oftentimes driving by will clue you in on some of the most obvious features such as security fence and gate, lighting and surveillance cameras. What about some of the other important factors such as secure key code entrance and staff that have your best interest as their top priority? This will require a call or a visit to ascertain.
Digital Surveillance:

Digital surveillance offers the best quality picture over tape storage. A security camera records everything that happens 24 hours a day. They will record in low light and provide evidence if an incident does occur.
Gated Security:

A security gate and fence is your first line of defense. A fence surrounds the facility and deters access from unwanted guests. Our gate is monitored day and night with a digital camera recording all activity around the gate.
Password Protected Entrance:
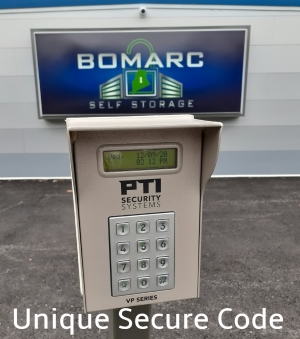
A good self storage facility will require each renter to have their individual secure pass code for entering the gate and any doors. These codes are unique to each user and provide an added layer of protection against unwanted visitors.
Lighting:

A well lit facility is a huge deterrent to criminal activity. Lighting throughout illuminates suspicious activity as well as brightens nighttime images on the video surveillance system. Lighting is very important to the overall security.
Staffing:
Onsite staffing is another layer of protection often overlooked. They monitor who goes in and out and look for unusual activity at the facility. They can be your eyes when you are not there. Walking throughout the self storage units inspecting locks and looking for evidence of tampering.
What Can You Do To Increase The Security Of Your Unit?
There are several things you can do to provide greater protection of your possessions while they are in self storage.
- Purchase a disc or cylinder lock. These locks afford the best protection because they are not easily snipped or cut. Oftentimes your homeowner’s/renter’s insurance will require this type of lock in order for your policy to be valid.
- Do not store valuables. Insurance policies whether your homeowner’s or the insurance you purchase at the facility will not cover money. Many will not cover valuable jewelry or collectibles. It is best to know what your insurance policy will and will not cover before deciding what to store in your unit.
- Keep your unique entrance code private. Sharing your code with others will increase the chance of a security breach.
- Choose an inside unit for an added level of protection.
- Make sure your unit is closed properly and locked before leaving the facility.
- If your door lock does not work properly report it to the facility manager. Your disc lock will not work as intended if the door lock isn’t working or is broken.
- Keep a record and pictures of your contents. This will expedite any claim if it becomes necessary.
- IF the unthinkable happens call 911 immediately! Do not touch anything until the police arrive. Notify the facility manager and your insurance company as soon as possible.
Picking the best self storage facility with the most security measures in place plus all the things you personally do to protect your possessions means self storage can be safe. It’s up to you to decide what level of security you feel the most comfortable with to secure your belongings while in storage. We strive to provide excellent security for a worry free self storage experience.
Do I Need Self Storage Insurance in Bangor, Maine?

What is Self Storage Insurance?
Self storage insurance provides financial protection for your stored property especially in Bangor, Maine. It also gives you peace of mind knowing these items will be protected while being stored. Some homeowner’s and renter’s insurance policies will cover possessions stored off-premises and others do not. You can purchase extra insurance to cover property in self storage.
Why Do I Need Self Storage Insurance?
Your property is stored at your sole risk while it is in self storage. It is a common misconception that your self storage unit is covered by the storage facility. Most storage facilities do not insure your personal belongings and have no responsibility to provide insurance. Some locations may require you to have self storage insurance to store your property with them. That is why it’s important to check on insurance coverage for your property before you decide to store your items. Also, look for other security measures at the facility that will help protect your property such as security cameras, gated entry, outside lights and someone who is on premise during part of the day.
What to do if the storage facility requires insurance coverage to store your property with them. First, inquire about the type of proof they will accept that you have insurance coverage for self storage purposes. Ask; If you aren’t covered through your homeowner’s or renter’s insurance, do they offer their own insurance plan or do they have a recommendation for a good insurance company. Most places will require a copy of the “Declaration” page of your policy. A declaration page is an outline of the coverage your policy has including if that coverage extends to off-premise locations like self storage. This page can easily be obtained from your agent if you can’t find your copy to provide the proof of coverage needed.
The next step in seeking protection for your stored items is to contact your insurance company. Ask your agent if your policy protects items in self storage and if not is there an option to add this coverage to your policy. It may require an insurance rider to your current policy to provide you with the financial protection you will need for your property in storage. This rider can be dropped once you have removed your property from self storage.
If your policy covers off-premise storage ask your agent to direct you to the part of your policy that covers self storage insurance. Read every detail of that section to see what is covered and what isn’t. Many policies have exclusions of events like mold and mildew, flooding, hurricanes and earthquakes plus varying limits of coverage on qualified events. Every policy has different types of exclusions and varying limits depending on the company and policy type. If you have questions, ask your agent to clarify any words you don’t understand and how it will affect your property while in self storage. Being familiar with this coverage could save you a costly mistake while your property is being stored off-premise.
What if your policy doesn’t offer self storage insurance?
Ask the storage facility manager if they offer insurance coverage and what the different levels of protection are. Most reputable self storage facilities offer coverage for an additional cost above the monthly rent for your unit. These levels start at, or right around two thousand dollars coverage for roughly a ten dollar monthly premium. The plans go up by thousand dollar increments from there, some cap at ten thousand dollars coverage and other plans offer a higher limit. The manager can inform you of the different limits of coverage offered and the monthly premium for each level. As with most insurance policies there are exclusions of covered events and limits on coverage. Be sure to ask about these before making a decision. If they don’t offer an insurance plan ask for a recommendation for an agency that does offer self storage insurance.
Once you have all your options for self storage insurance, choose the one or ones that give you the best coverage for your property. Be aware that many policies will not cover items like, money, expensive jewelry or furs. If you have those items you may need to obtain “specialty insurance” to cover such items. Specialty insurance is used for items or events that are considered unique or have special circumstances around them. The property that would be covered with this type of policy is rarely covered by standard insurance. A safe deposit box may offer the best protection for these types of valuable items but be aware that most insurance companies do not cover items in safe deposit boxes. Sometimes a combination of policies will offer you the best protection for your property.
Added Protection Steps For The Security Of Your Property.
Once you’ve made a decision on a self storage facility there are other things you can do to help protect your property. Following are a few examples of the simple things you can do for added security and protection.
- Choose a disc or cylinder lock
- These provide a higher level of security compared to other locks
- Keep moisture sensitive items off the floor
- Pallets or selves should be used to elevate your items
- Cover your items with plastic sheets
- This will better protect your property from dust or moisture
- Do NOT store “Valuables”
- Jewelry, currency or other valuable items should not be stored in self storage
- Do NOT store flammable or hazardous materials
- Storing these items are dangerous to you and the facility
- Rodent or Pest control: check if Professional Pest Control is offered
- Add dryer sheets to clothing and in bureau drawers. Mice dislike the strong scent
- DO NOT put food items in your unit
- Make an inventory of your stored items and pictures of your more valuable items
- Keep a copy of your inventory in a safe place; it will help expedite any claim.
It’s up to you to decide the value of your property and to protect them while in self storage. Be a smart consumer and be prepared with self storage insurance!

Ten Easy House Staging Tips!
Everyone’s heard of curb appeal but does it stop there? The outside is manicured to catch a potential buyer’s attention but is it enough? The answer is simple; No. It’s like buying a cake because the frosting is so appealing but when you cut into the cake and it is not that great inside. The inside needs to be special as well, to entice an offer. This is called staging and depending on your market can put your house far ahead of the competition especially in Bangor Maine and the surrounding areas.
If you have a limited budget to work with, there are still many simple things you can do that will improve the appearance of your home. Staging your home can make the difference between a sale and your home sitting on the market for a long time. Following are the ten basic areas that can make a difference when selling your home. Plus utilizing self storage will help you towards your goal of selling your home.
#1 House Staging Tip: Brighten your Exterior
This will be the first thing a potential homeowner sees. It may be the one thing that determines their interest on the inside. Spend some extra time making sure your lawn, trees, hedges and other plants are well-maintained. Trim, prune and eliminate any weeds in your yard. Add color with some flower boxes and brighten your windows with a good cleaning.
Inexpensive Touch: Purchase new door mats for the doors to add a fresh clean look to the entrance way.
Pro Tip: Pressure wash the exterior of your home to give it a freshly painted look.
#2 House Staging Tip: Clean your Home
Make sure your rooms sparkle, take extra care in the kitchen and bathrooms! If you can’t replace your kitchen appliances, make sure the ones you have are immaculate. No one wants to see crumbs, spaghetti splatter or grease in their potential home. Pay extra attention when cleaning your shower, tub and those hidden places behind the toilet. Your goal is to make it all look new.
Inexpensive Touch: Replace the shower curtain to freshen up the bathroom, keep it to a neutral color, no prints.
Pro Tip: Replace the kitchen appliances, buyers are looking for new appliances that come with a home.
#3 House Staging Tip: Declutter your Space
Clutter distracts buyers from seeing your home’s great features. The other aspect is it gives the illusion your home doesn’t have enough space or storage. Remove all knick knacks and non essential items. Remember that buyers will be checking out your closets so finding a self storage unit to store these treasures in will benefit you two ways. It will declutter your home and give you a head start on your packing after your home sells.
Inexpensive Touch: Put all non essential items in self storage, throw away things you won’t be taking to a new home because it’s beyond its prime. Hold a yard sale or donate the other things that still have value to them.
Pro Tip: Hire a moving company to come pack up your home except for the basics.
#4 House Staging Tip: Depersonalize your Home
This may sound harsh but buyers need to visualize their possessions in your space. Remove all family photos, refrigerator art and items of a personal nature. Put away the children’s toys and anything else that is highly personal.
Inexpensive Touch: Add these to the boxes in your self storage unit to keep the house more impersonal.
Pro Tip: Use a moving company to pack up your belongings.
#5 House Staging Tip: Remove Odors from your Home
Any potential buyer will be put off by odors in your home. Identify odors and remove their source. As we are immune to our home’s smell, ask a friend to help you. Deep cleaning will eliminate a lot of the smells.
Inexpensive Touch: Just before showing your home bake apples with cinnamon or cookies to fill your home with their inviting aroma. Burn scented candles with a homey feel and grind a lemon in your garbage disposal. Remove any garbage and open the windows for some fresh air.
Pro Tip: Hire a cleaning company to shampoo your carpets and deodorize your home. This is recommended if you smoke inside your home. Start going outside to smoke to keep your home fresh smelling.
#6 House Staging Tip: Wallpaper and Paint Tips
Fresh warm neutral tones on the walls helps a buyer envision their own decor in the rooms. Remove all wallpaper or custom paints, each person has their own taste in decorating and custom paints and wallpaper may put off a buyer because their taste is totally different.
Inexpensive Touch: Remove wallpaper and freshen walls with warm neutral colors. DO NOT paint over wallpaper.
Pro Tip: Hire a painter to freshen the paint in your home.
#7 House Staging Tips: Lighting is Everything
Show off your home’s beauty, open the curtains and let the natural light in. Supplement this with additional lighting where necessary. Your freshly cleaned windows will add sparkle as well.
Inexpensive Touch: Wash all fixtures and replace any broken or damaged ones.
Pro Tip: Upgrade any outdated fixtures with fresh warm lighting to add to the ambience.
#8 House Staging Tips: Flooring
Dirty rugs and linoleum will deter a potential buyer from your home. Consider which rooms would benefit the most from a flooring upgrade and consider hardwood floors for added value. If a carpet can be easily cleaned rent a carpet cleaner and freshen the rugs.
Inexpensive Touch: Upgrade the bathroom floors, they have relatively small areas therefore are the least expensive to do. Use high-quality vinyl flooring that mimic ceramic or stone tiles.
Pro Tip: Replace bad flooring with hardwood floors, ceramic or stone tiles to add long term value to your home.
#9 House Staging Tip: The Furniture
Use the right size furniture to give your space the homey feel. Too much furniture will create a small, cluttered looking space. Using furniture that is too small will make a space feel cold and impersonal. The goal is a warm and inviting living space.
Inexpensive Touch: Rent nice furniture to stage your home. This will give it a new bright look without breaking your wallet with new furniture.
Pro Tip: Hire someone to stage your home to give it a homey feel.
#10 House Staging Tip: Define your Rooms
Make sure each room has it’s single defined purpose. This helps buyers see how to maximize the home to it’s best potential. If you have finished rooms you are using for storage, clean them out and turn them into an office or another simple bedroom. Utilize every space to it’s potential giving the buyer an overall experience that will have them submitting an offer so they can put their decorating twist on the house.
Just before an open house or showing, make sure your staging efforts have the maximum impact. Use some last minute touches to create a warm and inviting atmosphere. Fresh air and cut flowers are the top two last minute touches that can put your efforts over the top. Open your windows at least 15 minutes prior to a showing! Another tip is the fresh baked smell of cookies, it conveys the warm home feel that often leads to an offer. Purchase some “slice and bake” cookie dough, bake and let the aroma fill your home. Overall you want your potential buyer to visualize themselves in this space. Specifically, to get the most out of your staging efforts your home should appeal to a broad range of buyers. The more people it appeals to the more offers you will receive for your home.

During this time of Covid-19 when families are drastically affected by the shutdown or closure of many businesses in Ellsworth, Maine. Many local services are following the state guidelines, slowing down the process for help to these families in need. When it takes 6 months to finally receive the unemployment money you applied for at the beginning of the pandemic things can be very stressful. What can you do to help others?
Tip #1: FOOD HELP
Search out your local food pantry or food bank and donate non perishable items. Every item helps a family provide nourishment and prevents hunger. Want to help in a big way? Volunteer your time if they are doing delivery to homes to keep the possibility of contamination down. How rewarding to drop off a much needed box of food to a family in need!
Pro Tip: Go to your local dollar store and purchase 20 items that are essential to a home that are often overlooked at food pantries. Items like toothpaste, body wash, diaper wipes all things that never go bad and will help a family keep healthy too! (check to make sure the place you are donating the items to will accept these types of donations)
Tip #2: HOMELESS SHELTERS/HALFWAY HOUSES
Imagine being in a shelter during this time of uncertainty. Like food pantries the shelters provide meals, as well as showers, laundry and other necessities. Check with your local shelter and see if they can use laundry detergent, dish soap, paper towels, toilet paper, bleach, and food. Use your local family dollar again for the biggest bang for your donation dollars.
Pro Tip: Check with your shelter and see if they are accepting clothing and other household items to assist with setting up a rental for their clients. If so go through your house and donate items you no longer need from clothing to towels, dishes and linens.
Tip #3: HOLIDAY HELP
With the approaching holiday season this year will be especially hard on many families. Donate coats, hats, gloves to the Coats for Kids campaign. Donate at a Toys for Tots, Angel Tree location or at your local Catholic Charities organization. When you see the Salvation Army ringing their bell outside a store stop and drop some change or bills into the red kettle. Every little bit helps these organizations provide a gift to a child or family affected by this pandemic.
Pro Tip: Volunteering at one of these organizations can be a rewarding experience. A little time goes a long way! Volunteer to shop for the gifts, drop off Thanksgiving or Christmas meals, be a secret Santa!
There are many other little things you can do to help others. Check with your neighbors to see if you can save them a trip to the store for milk and bread. Assist an elderly person by picking up their prescriptions and other items to save them a trip out and possible exposure. It takes a community to survive, become part of your community!
Recent Comments